My Basic Granola

Summer seemed to take forever to arrive, the winter just wouldn’t let go of the weather spotlight. Despite its tardy arrival, summer is well and truly upon us and with the warm weather comes a change in how I eat and cook. Summer breakfasts often revolve around seasonal fruit, yoghurt and granola. The last few days have been super scorchio and this morning’s break in the heat meant I was finally able to get into the kitchen to top up our granola supplies.

img_8770

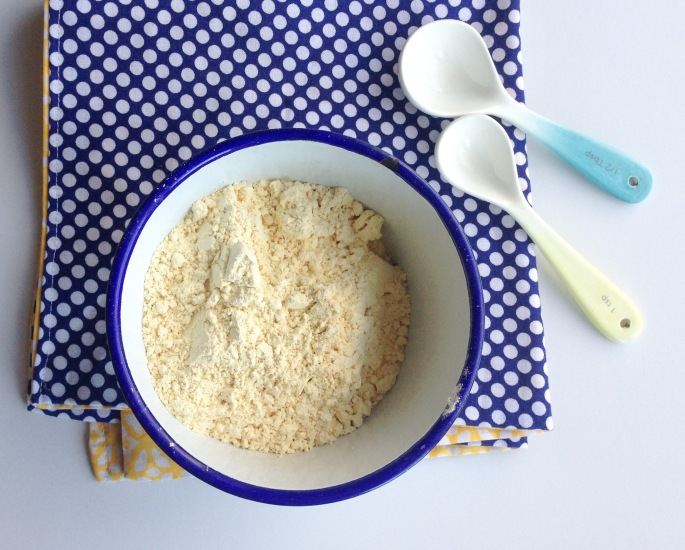
Making homemade granola cannot be easier and you can tailor the recipe to suit your tastes and pantry staples. I always use oats as my base, however if you are after a gluten-free option they can be replaced with another whole grain, like quinoa flakes or buckwheat. Oats are a wonderful source of soluble fibre, they are easy to digest and help to prevent big spikes in blood sugar levels. Go oats! I used spelt flakes in this batch as I had them in the pantry, they bring a whole heap of nutritional benefits to the party too (fibre, iron, zinc, magnesium and protein), as well as a great nutty flavour. I like to include quinoa flakes as they add a great protein hit. The puffed millet isn’t essential, I had some to use up, however it does add another textural element though, as well as protein, fibre and niacin. Puffed brown rice would work too.

Really, the combination of whole grains is completely up to you. At the end of the day, I don’t choose my grains based on their individual nutrient profile. I go with what is in my pantry and the flavour combos I like. Including wholegrains in your diet though is definitely a good thing, as they deliver plenty of health benefits. They are a wonderful source of fibre, protein, heart healthy fats, B vitamins and minerals. plus they are delicious and pretty budget friendly too.

img_8953

The same can be said about the nuts, seeds and dried fruit. I like to add chopped almonds, pumpkin seeds, sunflower kernels, sesame seeds and chia seeds as I always have these beauties in my pantry. Really the type of seeds or nuts that you use is totally up to. use what you have and whatever floats your boat.

The almonds are full of heart healthy monounsaturated fats, especially oleic acid which helps to lower blood cholesterol levels and reduce blood pressure. There is also plenty of vitamin E in almonds, which acts an antioxidant mopping up free radicals produced in the body. I always keep the skin on my almonds as the flavonoids found in the skin combine with the Vitamin E doubling the antioxidant activity. The consumption of almonds has also been shown to reduce the overall glycemic load of a meal.

Sunflower seeds, whilst small, offer a nutritional punch, providing some B vitamins, particularly folate, protein and heart healthy fats. Pumpkin seeds are the mineral warriors of the group, full of zinc, magnesium and iron. The sesame seeds, as well as providing plenty of Vitamin E also provides a good amount of calcium, which is perfect if you don’t have cow’s milk with your granola. I love adding chia seeds to meals as they provide plenty of fibre, protein and some iron, folate and calcium.

When it comes to dried fruit, again it is totally up to you. I always tend to use a few dates, some goji berries or dried cranberries and I will throw in some shredded coconut to the mix too. Sometimes I forget all about the fruit and I don’t miss it one bit.

img_8775

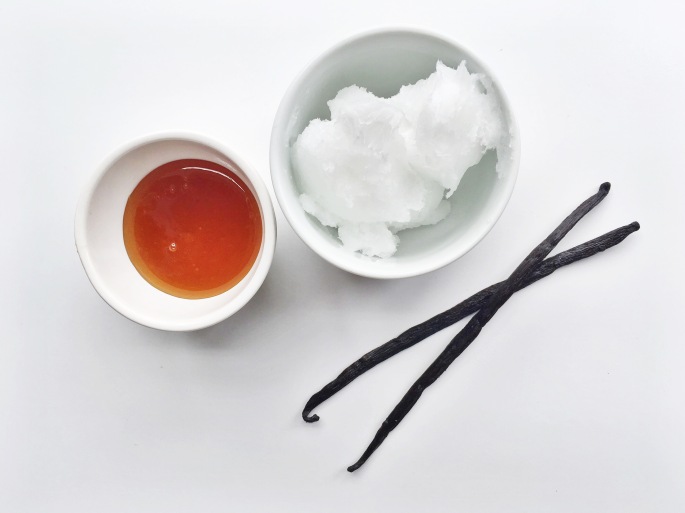
To help my granola crisp up and become all crunchy delicious I coat the mix with some coconut oil. Due to super hot Summer temperatures, I tend to find my coconut oil in a liquid stage, which is super helpful. If the weather is cooler I melt it first.

My granola is sweetened with a little bit of maple syrup, because we all need a LITTLE sweetness in our lives. It is the minimal added sugar content of my homemade granola that makes this granola way better than anything found in a packet in the supermarket. It is best to remember that the dried fruit, if using, does bring its own brand of added sugar to the party, so factor this into to your day of eating food.

img_8774

img_8771

My Basic Granola

1 cup whole oats
1 cup rolled spelt
1 cup quinoa flakes
1 cup puffed millet
1 cup raw almonds, roughly chopped
1 cup pumpkin seeds
1 cup sunflower kernels
1/2 cup sesame seeds
4 tbsp chia seeds
1 cup shredded coconut
1/3 cup coconut oil, melted
1/3 cup maple syrup or raw honey
3 tsp vanilla extract or the seeds from two vanilla pods
1/2 cup goji berries or dried cranberries
6 medjool dates, pitted and diced

Preheat your oven to 160C.

Place the oats, spelt, quinoa flakes, puffed millet, almonds, pumpkin seeds, sunflower kernels, sesame seeds, chia seeds and coconut in a big mixing bowl. Add the coconut oil, maple syrup and vanilla and mix through until every grain, nut and seed is coated and glistening.

Place half the mixture onto a large baking tray and the remainder onto another large baking tray. Pop into your oven and bake for twenty minutes. Keep checking the granola every five minutes and using a spatula or large metal spoon turn the mixture over gently. I do this whilst the tray is in the oven, however if you are worried about spillage then remove the tray and turn the mixture over and pop back it.

whilst the granola is looking a beautiful golden colour and the smell is wafting throughout the kitchen, it is time to remove it. Let the granola cool a little on the trays before tipping into a big mixing bowl.

Let the granola cool completely and then stir through the goji berries and dates. Store your granola in a large glass jar.


Hopefully, you will enjoy this granola as much as we do. The beauty is in its simplicity and you can change up the ingredients and flavour to suit you. Tag me on Insta #liaburtonnutrition if you make a batch and tell me how you love it.


My top 5 tips for an organised pantry

2015-09-20-16-10-45-2

I wish I had a beautiful walk-in pantry lined with open shelves, filled with matching jars full of nourishing wholefoods like the ones I find on Pinterest. Alas, I have a boxy corner pantry, which must have been designed by a seven foot man-giant. The shelves are so deep I can’t even reach the back where the corner meets. The shelves are so tall that I require a stool and tip-toes to reach the top one. Forget about anything that finds its way to the back of the top shelf, it’s in pantry purgatory now. It doesn’t help that I’m all of 155cm tall, the fact remains my pantry was not designed with me in mind. The likelihood of a new pantry situation is zero to none, instead I make use of what I have and make sure that it is organised within an inch of its life. Otherwise I would spend even more time standing in front of it, holding the door open looking for some kind of inspiration from the food gods as to what to cook for dinner.

If your pantry is more food jungle than organised food bliss my simple steps can help you out. I do recommend finding a couple of hours, as this level of organisation requires a bit of effort, however the results are well worth it.

Step 1. Clear everything out

Take everything out and place it on your kitchen bench. Get rid of anything that is full of junk, overly processed and doesn’t nourish your body, or is out of date.  If it’s not there you cannot to eat it. I know if I have chocolate in my pantry I will find it and eat all of it, in one go.  Lastly give the shelves a good old wipe down to make everything clean and sparkly.

Step 2. Organise everything into sections

Once you have gone through all the food that was in your pantry and chucked anything you don’t want anymore, divide what is left into usable sections.  Think about who needs to access the foods in each section and make sure they can be easily reached.  I have my breakfast section down low so that the kids can easily make their own breakfast of a morning.

I have my pantry divided up into:
+ cereals – rice, pasta, noodles, etc
+ flours – I only keep the ones I use very often in the pantry, otherwise I pop them in the        fridge to stop them going rancid.
+ baking, including sweeteners – maple syrup, vanilla, baking powder, etc.
+ seeds, nuts and dried fruit
+ whole grains and legumes – quinoa, brown rice
+ condiments – tamari, ketchup, apple cider vinegar, etc
+ breakfast – oats, granola, rolled spelt, muesli, etc
+ tins – chickpeas, tuna, coconut milk
+ teas and coffee

Step 3. Jar and label

Buy some jars or reuse what you have already. I tend to grab my jars from Ikea or Kmart as I like to put the foods I use often, like spelt flour, into bigger jars. I reuse all my smaller jars for food I keep smaller amounts of, like dried beans. Label every jar so that there is no forgetting what is inside it and so you can easily locate what you are looking for. Think about investing in a label machine or source some gorgeous labels like these ones here and here.

img_8111

Step 4. Use your space

Pantry shelves can be deep and tall, I know mine are.  They can also become quite tardis-like when left to their own devices. Packet of 2 year old masa harina anyone?  To avoid the old chuck-it-in-and-hope-I-can-find-it-when-I-need-it routine, I use removable shelves to double the space and keep things more visible.  I picked mine up from Ikea.

Step 5. Fill it with the good stuff

I love this step.  It makes sense that if you have put in all the hard work clearly out all the junk that you only put back the food that will nourish your body.  You know, real ingredients with which to make delicious and nutritious meals for yourself and your loved ones.  Us mummas are a busy bunch and by stocking our pantries with real food basics saves us time in the long.  If you know you have the basics in your pantry then a trip to the market for fruit, veg dairy and meat is all we will have to do.

If you are starting your real food journey and are a bit unsure of what you should have in your pantry keep an eye out for upcoming ‘my kitchen essentials’ to check out what I keep in my pantry, as well as my fridge and freezer.

img_8113

If in doubt, ask for help.

If you like the idea of an organised pantry full of the good stuff but feel completely overwhelmed by it all, don’t stress. Sometimes the idea of clearing out food is just way too hard, even when we know that that type of food is just not nourishing. Or you are in the first steps of moving away from highly processed foods to a more real way of approaching food and just don’t know what you should be keeping in your pantry and how to use it. All of that stuff can be totally overwhelming. We all know that when things start to overwhelm us its then that we need to ask for help. Enlist the help of a kind soul who has the goods on eating real, nourishing foods who can guide you gently through it all. There are plenty of folks out there that offer a pantry overhaul.

If you are in the Geelong region (that includes you Surf Coast and the Bellarine) I offer a Fridge and Pantry Makeover, where I spend two hours with you, helping you ditch the junk and reintroduce delicious and nutritious whole foods to your everyday eating.   As well as clearing out your pantry and fridge you will receive tips on restocking, a list of real food pantry staples, shopping tips, advice on storage and meal planning.  Plus everyone who signs up will receive a recipe booklet filled with ‘better basics’, list of seasonal produce and a shopping list template.  If you need a sparkly and organised pantry shoot me an email to book in a time.

super easy wholegrain bread

IMG_7864

My middle kiddo loves a slice of bread or three.  If left to her own devices, she would live entirely on the stuff.  Thankfully for her sensitive tummy I’m onto her and try to limit her intake.  I also make sure that the bread she eats is the good stuff, think spelt sourdough and homemade loaves.  I devised this bread with her in mind.  It is chock-a-block full of whole grains and seeds but isn’t too bitty, you know what kids can be like.  Whilst this bread isn’t gluten-free, it is lower in gluten than most traditional wheat loaves, and is full of oats, spelt and rye which are a little easier to digest.

My super easy wholegrain bread is basically a fibre and B vitamin love bomb.  The types of fibre found in the oats and the rye do an amazing job of regulating blood sugar levels, preventing any energy sapping spikes occurring.  Fibre is also pretty handy at keep as regular, which whilst not fun to talk about is super important.  Wholegrains and seeds are a wonderfully yummy way to get a whole raft of the B vitamins into you.  At their most basic, and lets face it when it comes to what our body actually does with the food we eat nothing is really basic, B vitamins help the body release the energy from the food we eat.  What freaking superstars.  B vitamins also do a whole heap of other amazing feats, but I feel that is post all of it’s own for another time.

We often think of bread as being a carb party and whist this bread has plenty, in the complex, slow release form, it has also invited its friends protein, fibre and fatty acids along for the ride.  Which is good news for anyone eating it as they will fuller for longer and won’t be needing to hit the cookie jar anytime soon after.

easy multigrain bread

There is magnesium aplenty from the oats, spelt and pumpkin seeds however, the presence of the phytate in the fibre-rich wholegrains can act as an inhibitor for its absorption.  But don’t fear, phytates don’t block all magnesium from being absorbed so there will be some available to assist with energy generation, protein synthesis and muscle contractibility, especially heart muscle.

We all know calcium is vital for bone structure and strength but what else does this mineral superstar, found in the rye and sesame seeds, do?  Think blood clotting, muscle function, regulating blood pressure, enzyme functioning and assisting with immune defences. Phew, calcium is a busy little bee.

Zinc in the rye, pumpkin seeds assists in immune function, protein synthesis, thyroid function, insulin release and wound healing.  Whilst the vitamin E is found in the sunflower and sesame seeds acts as a potent antioxidant, helping to defend against the adverse effects of pesky free radicals.  Vitamin E requires the presence of fat to aid help the body absorb it, it being a fat soluble vitamin and all, so feel free to slather a bit of butter on your bread.  I know I do.

If you are still reaching for a plastic wrapped wholegrain loaf from the supermarket, give this one a go.  It seriously takes 15 minutes of your actual time to make, plus you get two loaves.  The rest of the time is spent being massaged and resting in the warmth, just like the bread.  You also have the added bonus of knowing exactly what is in your bread and get heaps of  bragging rights.  Instagram pic anyone?

easy multigrain

super easy wholegrain bread

250g wholemeal spelt flour
250g plain spelt flour
200g rye flour
100g whole oats
75g pumpkin seeds
30g sunflower kernels
30g sesame seeds
2 tsp salt
4 tsp dried yeast
500ml warm water
2 tsp maple syrup
1 tsp milk, to use as glaze
extra pumpkin seeds and oats to top the loaves

Place all the dry ingredients, except the extra pumpkin seeds and oats, into the bowl of a stand mixer.  If you don’t have a stand mixer, like a KitchenAid, don’t worry you can still make this bread.  Just pop everything into a bowl and knead by hand when the time comes.  Add the wet ingredients, except the milk for the glaze, and using a dough hook, knead for 10 minutes.

Grease two loaf trays.  Once the dough has been kneaded, divide in half and shape each half into a loaf shape.  Place the dough into the trays, brush the tops with the milk and sprinkle over the extra pumpkin seeds and oats.  Cover the loaves with a tea towel and let to rise for 1 hour, or until doubled in size, in a warm spot.

Pop the trays into a preheated 210ºC oven and bake for 30 minutes.  Once the loaves are golden on top and sound hollow when tapped, turn out onto a wire cooling rack to let cool.  If you are at all like me, grab a serrated knife and slice of the crunchy end piece, slather with butter and pop into your gob.

Now take a photo, pop it on Instagram #liaburtonnutrition and we can all check out your amazing loaves and clap and cheer.


Here’s to a house smelling like freshly baked bread.

xx Lia

cauliflower and zucchini fritters - lia burton nutrition

Cauliflower and Zucchini Fritters For The School Lunch Box Win

Monday saw my kiddos go back to school after the Easter holidays and truth be told I did a little happy dance.  Don’t get me wrong, I love having them home with me. It’s a time  for sleep ins, easy mornings, day trips exploring nature and catching up with friends.  It’s also a time jam packed with sibling squabbles, noise, mess and so many requests for food.  How is it that children can quite happily have one snack break and lunch at school, but at home it’s all day grazing?  Maybe I need to bring some school time structure to the holidays. Who am I kidding, that’s so not me!  School holidays also mean I get absolutely no work done. Zilch, zero, none.  Hence my happy dance at the return to a quiet house in which I can be really productive and actually get stuff done.

Their return to school also means I’m back to making school lunches and I thought I would share with you the recipe for my cauliflower and zucchini fritters.  These little babies went down a treat with my kiddos and are perfect for popping into lunch boxes.  They taste great hot or cold, on their own or tucked into a sandwich.  I use besan (chickpea) flour in my fritters, which makes them gluten free, and also imparts a lovely nutty flavour to them.  You can substitute the besan flour for any type of flour, whatever you have to hand will work.  I just have a shed load of besan in my fridge and am finding ways to use it up.

Cauliflower and zuchini fritters

Once you get the hang of the fritter, the combinations are endless.  They are really just vegetables, egg and flour at their core.  You can use up whatever veg you have lurking in the crisper drawer of your fridge.  Think grated pumpkin and haloumi, broccoli and carrot, spinach and pea.  The idea is to get creative.  The egg is important as it helps to bind everything together.   If you are cooking for someone with an egg allergy, another protein may work, like mince or mashed beans, but don’t quote me on this.

cauliflower and zucchini fritters - besan flour - lia burton nutrition

I created these fritters with my eldest in mind.  Zoe has decided that eating meat just isn’t her bag and has decided to give it a flick.  It is a decision she hasn’t come to lightly, but she is dedicated to her new found vegetarianism.  As a result of this, I have had to get my thinking hat on to make sure she gets nourishing and yummy lunches that tick all the boxes.  Lucky for Zoe, her mum’s a nutritionist and a foodie!

cauliflower and zucchini fritters - grated veg - lia burton nutrition

cauliflower and zucchini fritters - lia burton nutrition

Cauliflower and Zucchini Fritters (gluten free, vegetarian, kid-friendly)

1 free range egg
1 cup of besan flour
1 tbsp Greek yoghurt
1 tsp baking powder
1 small zucchini, grated
1/4 head of cauliflower, grated
1/2 cup of grated cheese
1 tsp sea salt
Freshly ground black pepper

Break the egg into a mixing bowl and whisk until it has doubled in volume.  Add half of the besan flour and mix to form a paste.  Add the yoghurt and stir to loosen up the mixture.

Add the grated vegetables, remaining flour, baking powder and cheese and mix well to combine.  Season with salt and pepper.

Heat a generous amount of oil in a frying pan over a medium heat.  Add spoonfuls of mixture and cook for five minutes on each side until golden. Remove from the pan and drain on paper towel.

I like to serve these fritters with a squeeze of lemon and a little bowl of Greek yoghurt to dunk them into.

xx Lia

the real deal pancakes

Going against the flow + real deal pancakes

the real deal pancakes

Today is Shrove Tuesday or Pancake Day as my kids would want it known.  Being all about the food, I’m all for an official renaming of the day to ‘shove all the yummy, fluffy pancakes in your gob’ day.  I doubt my kids school would be so keen.  They will probably keep to tradition.  Fair enough.

In keeping with such tradition, my children’s school have a pancake morning tea.  Parent helpers file in to assist with the mammoth task of cooking more than 700 pancakes.  In keeping with my real food approach to cooking and eating, I opted to make my three kiddo’s pancakes at home and bring them up to school.  I can no longer go with the flow and allow my kiddos the supermarket shaker pancakes.  Or the lollies handed out to celebrate fellow student’s birthdays.  Or the fairy floss on LOTE day (that one I just can’t figure out!).  Or the additive and artificial-colour filled icy poles for sale at lunch time.  I had to draw a line in the pancake batter, so to speak.

The pre-packaged version is full of refined wheat flour, sugar, non-fat milk powder, maltodextrin (a form of sugar with a super high GI that is absorbed quickly into the blood stream.  Hello blood sugar spike.), egg powder, an anticaking ingredient and salt.  I understand why these ingredients are in a packet mix, they just don’t need to be in my child’s diet.  Personally, I try and mix things up a bit when it comes to flours and not rely on just wheat flour.  As for non-fat milk, that stuff is just not allowed in my house.  Milk is not a high fat product to begin with, around 3-4%, so why mess around with the real stuff to make something that tastes like milky water.

With pancakes in hand, I found my three kiddos in a sea of blue and gold.  It is deceptively hard to locate your own flesh and blood in a crowd of 350 kids all wearing the same thing. Hats on and its almost impossible!  Thank goodness for sharp-eyed teachers.  Zoe, Eadie and Mackie seemed more than pleased with their pancakes that were gloriously fluffy and large and not pale, insipid and as flat as, well, a pancake.

As pancakes are the order of the day, I thought it best to share my recipe for my fluffy, delicious pancakes that are made using real ingredients.  The kind of ingredients you will have in your kitchen.  Wholegrain flour, eggs, milk are the simple trinity that form the basis of these delightfully sin-free pancakes.


The Real Deal Pancakes

1 cup wholemeal spelt flour, you can you use plain wholemeal flour
1 tbsp baking powder
1 cup milk
3 eggs, separated
1 tbsp maple syrup or honey (optional)

Whisk the flour, baking powder, milk, egg yolks and maple syrup together until nice and smooth in a large mixing bowl.

In a separate bowl, whisk the egg whites until the form stiff peaks.  Add 1/3 of the egg whites to the pancake batter and mix in.  Gently fold the remaining egg whites into the mix until all the egg white has been incorporated.

Heat a large pan to a medium heat and add a small amount of butter to coat the pan once melted.  Make the pancakes as large or as small as you like them.  I usually cook two at once in the pan.  When bubbles start to appear in the top of the pancake, flip them over and cook until golden on both sides.


Here’s to moving forward and not going with the flow,

xx Lia

First day of school feels + Muesli bar slice

IMGP3981

My youngest babe is starting school next week.  My feels are all over the place.  One minute I’m thrilled to bits for this really ace kid as he is so excited to be going to school, and the fact that he looks super cute in his uniform is a bonus.  The next, a wave of pure emotion washes over me and I have water welling in my eyes.  I’m looking forward to the silence that will transcend over the house, especially after the Yell Fest 15/16 (school holidays) ends.  I can’t believe how loud an argument between a ten year old and an eight year old is!  I really can’t wait for all the extra mental space I will get with no interruptions from children requesting food, drinks, more food, the ipad and all their other really important needs to be able to focus on my little nutrition business (if you need a Nutritionist in 2016, I know a good one!).

I really can’t quite believe how quickly life travels and a milestone, such as your youngest starting school, is such a reminder of this.  Whilst I am going to miss my ace kid so freaking much, I am also so very ready for the next stage in my life.  The stage where I get to make a whole heap of goals and hit them hard.  This year of 2016 I have declared to be the year of me.  The last ten years has seen me devote so much time, energy and love towards my kidlets, and whilst I wouldn’t have had it any other way, I am now ready to make me more of a focus of the time, energy and love.

That said, I still need to get the kids organised for their imminent return to school and so I hit the kitchen this morning and knocked up a rather awesome muesli bar slice.  Me being me, it had to be nourishing and delicious, and I reckon I have met the brief.  Oats are such a great addition to your baking as they provide heaps of soluble fibre, keeping little tummies feeling fuller for longer.  Oats are also a good source of B vitamins, particularly thiamin and niacin, that assist in energy metabolism and helping fuel active bodies.

I thought it only fair that I share this winning muesli bar slice recipe, as I know quite a few mums that will be feeling all the feels about their kiddos starting school this year. And for those of you well established in the school life, I salute you, you survived the holidays.  Enjoy the peace next week.  And maybe a cheeky piece of my muesli bar slice.


Muesli Bar Slice

1 1/2 cups oats
1 cup puffed rice
1/2 cup quinoa flakes
1/3 cup wholemeal spelt flour
1/2 cup desiccated coconut
3/4 cup pumpkin seeds
3/4 cup sunflower seeds
1 tbsp chia seeds
125g butter
1/2 cup nut butter or tahini
1/2 cup honey or rice malt syrup
1/2 cup golden caster sugar or coconut sugar
1 tbsp vanilla extract

Preheat the oven to 160C.  Line a slice tray with baking paper.

Mix the oats, puffed rice, quinoa flakes, spelt flour, coconut, pumpkin seeds, sunflower seeds and chia seeds in a large mixing bowl.

Pop the butter, nut butter, honey, sugar and vanilla into a saucepan and gently melt everything together over a low heat.

Pour the wet mixture into the dry mixture and stir well to combine everything together.  Pour the batter into the lined slice tray and bake in the oven for 30 minutes until golden on the top.  Remove and let cool completely before slicing.


Here’s to moving forward

xx Lia


Lunch Box Loving + Banana Bread

School lunches are a big part of my weekday mornings.  Two of my three kiddos are at school, with next year seeing all three there, I’m an old hand at the school lunch box.  I’m definitely not one of those uber-organised, make-the-lunches-the-night-before kinda girl. I’m a more of a chuck-it-in-the-lunch-box-whilst-loudly-reminding-my-girls-to-get-their-school-uniform-on kinda girl.  If I had $1 for every time I ‘reminded’ the girls to put that #$%&ing uniform on I would be able to employ someone else to do the morning routine.  Whilst the evening before isn’t my bag, a bit of Sunday baking and organisation is.  I need to have tasty, nourishing snacks and meal options on hand to pop in the girl’s lunch boxes or all they get is just cut up fruit and veg, which no kid wants to open a lunch box and find just that.  This weekend will see me cooking up a storm, accompanied by the whirlwind of mess, in my kitchen.  I’m not a clean cook, but that is a story for another day.

Today, I offer some lunch box loving I have found in my travels in internet land that may end up filling your little ones, or even your own, lunch box in the coming week.  I feel a weekly wrap up of all the good lunch box options out there may just have to become a regular feature.

Spelt muffins from Colour Me Anna.  These look like a really yummy basic muffin recipe.

Easy mini lasagne from Planning With Kids.  My bread hater loves these for lunch, either cold (kids hey!) or warmed up in and popped in her thermos.  Just make sure you remember a knife and fork.

Nut free muesli bars from Lisa Corduff.  These are an absolute winner and feature in my girl’s lunchbox often.  Even my fussy middle one likes these!

Choc-nana and sesame biscuits from Hello Lunch Lady. How good do these look?  I think it is physically impossible for Kate Berry to make anything look bad in her photos.

This Sunday’s bake off will see me busting out my banana bread as I have a glut of bananas turning a lovely shade of black in my fruit bowl.  Does the food world need another recipe for the ubiquitous banana bread?  Probably not, but I offer up this version anyway. It tastes delish and is pretty nourishing to boot.  It is gluten-free, dairy-free and processed sugar free just because that is what I felt like making when I developed this one.  It can even become a vegan super star if the eggs are replaced with a chia gel.  See here for lowdown on chia gels and other egg replacements.


Yet Another Banana Bread Recipe

1 cup brown rice flour
3/4 cup buckwheat flour
2 tsp baking powder
1 1/2 tsp cinnamon
2 eggs, lightly beaten
1/2 cup coconut oil, melted
2 large bananas, mashed
2/3 cup coconut milk
1/2 cup maple syrup
1 tsp vanilla extract
decorations – I banana cut into rounds, pumpkin seeds, coconut flakes

Preheat your oven to 180C or 170C fan forced.

Pop all the ingredients into a large mixing bowl and mix together with a spoon (can it be any easier!).  Pour the mixture into a loaf tin lined with baking paper.  To decorate simply sprinkle the banana rounds, pumpkin seeds and coconut flakes on top.  Place into your preheated oven and bake for 40-50 minutes.  If the delicious cinnamony-banana smell wafts through your kitchen any earlier, check to see if it’s cooked.  Let cool in the loaf tin for 5 minutes before turning out onto a wire tray to cool completely.  I can never wait this long and always slice off the the end piece and slather it in butter whilst still warm, but that’s how I roll.

As a parent of school kids and a nutritionist, I fully understand the importance of healthy school food.  Stay tuned for lots more info and inspo about healthy, nutritious and yummy food that you can pop into your kids lunch boxes.

Here’s to moving forward

x Lia

No Eggs? I am here to help.

IMG_4136


I woke this Monday morning to glorious sunshine and a disorganised kitchen.  Family life got in the way of me organising anything for my girl’s school lunch boxes over the weekend.  There were a few pieces of fruit and veggies knocking about, some cheese and wraps.  I can work with that for their lunches.  However, there was absolutely nothing in the way of a yummy, nourishing home-baked treat for their snack.  I had time to knock something together, muffins are quick and easy.  Good, decision made.  As I started to gather the necessary ingredients to whip up my super tasty, fail-safe muffins I soon realised that we had no eggs.  NO EGGS people, I never have no eggs.

Back in the day, I used to be able to amble into my backyard and find a freshly laid egg in the chicken coup.  Those days are gone.  My two girls, who provided us with pretty much an egg each a day, are now one girl who is passed her egg laying prime.  The remaining chicken, Olivia (named after a pig!), is a bossy old bird who, when given the chance, will attack the cat and the rabbit with a swift beak to the head.  She would not welcome new birds into the flock with open wings and will live out her days roaming our garden, pooing everywhere, keeping our bug population at bay for her remaining days.  Which will probably be for years and years knowing her.  I now have to buy eggs from the shop.  But I digress, back to my lack of egg problem.

IMG_4127


I was determined to bake these muffins now.  I had the spelt flour, oats, butter, yoghurt and blueberries on the bench already and they weren’t going away until I had a fresh batch of warm muffins to put in the girls lunch boxes.  What to do?  I let my brain tick over for a minute and thankfully it was working, despite the Monday morning.  Chia seeds.  I would make a chia gel to replace the egg.  Problem solved, muffins baking in the oven, Mother of the Year badge coming my way.  The resulting muffins where a winner, with the girls giving them two thumbs up upon their return from school.

IMG_4129

chia seeds on left and chia gel on right

There are plenty of baking situations when an egg replacement is necessary.  No eggs (doh), vegan, egg allergy or you just don’t like eggs.  Thankfully, there are a few kitchen tricks to ensure that egg-free baked goods are just as lovely as their egg-loving cousins.  My go to egg replacer is a chia gel as it is full of fibre, protein, omega-3 fatty acids, calcium and magnesium.  Whilst I love eggs for their nutrition punch, I’m pretty happy making the swap to chia.  The muffins rose and the kids ate them, an out and out win in my books.  There are other alternatives such as flaxseeds, banana, apple, tofu and gelatin, with the following little infographic explaining how to use them instead of an egg.  I have also heard of nut butter and yoghurt being used too.  I’m generally not a fan of overly processed food and have never used a packet egg replacer, but they exist and if they work for you then yay.

Egg Replacers


Eggless Blueberry, Oat and Dark Chocolate Muffins

Makes 12

1 tbsp chia seeds (or 1 egg, whisked)
1 1/2 cup spelt flour (plain flour is just fine here)
3 tsp baking powder
1 1/2 cups oats
1/2 cup unrefined golden caster sugar*
125 ml milk of choice
5 tbsp vanilla maple yoghurt**
125 g butter, melted
1 cup blueberries, fresh or frozen
1/4 cup dark chocolate chopped up into pretty small chunks

Make a chia gel by mixing the chia seeds with 3 tbsp of water and set aside for 20-30 minutes until the mixture becomes all jelly like.

Preheat oven to 180 degrees and line a muffin tray with paper cases.

Mix the flour, baking powder, oats and sugar together in a large mixing bowl.  In a jug or bowl combine the milk, yoghurt, melted butter and chia gel and pour into the dry ingredients.  Mix everything together.  Add the blueberries and chocolate and fold through the mixture.  Fill each case with mixture and cook for 15 minutes or until golden on top.

*you can use sugar of your choice here.  Coconut, rapadura, panela all work fine, I just had unrefined caster sugar to hand.

**I would normally use plain greek yoghurt in these muffins but I turned my plain yoghurt into maple and vanilla yoghurt the night before for the kids dessert.  When using plain yoghurt I add 1 tbsp of vanilla into the mix.


IMG_4128


Now I’m off the meal plan the hell out the week so not to fall short in the lunch box organising game again this week.

here's to moving forward


Mackie’s Chocolate Milk

IMGP3442 (2)

My son was a little bit addicted to chocolate milk in his super fussy years.   Just like his days of white-blond curls adorning his beautiful head have gone, so to have his super-fussy, refusing any food that didn’t come out of a boob days.  In those dark and frustrating times he seemed to live on toast, milk and air.  It didn’t help that he is naturally a little mite (I fear he has inherited my petite stature), I’m sure people thought I wasn’t feeding him at all.  I was!  He just wasn’t into food.

With two older children to wrangle as well, I took the easy route and gave him what I knew he would eat.  Toast and milk.  I know there was way more than just toast and milk, but my memories of that time focus on this.  My middle daughter was also pretty good at creating her own havoc with my plans to feed my kids nourishing food.  Our chickens were well fed during this time, that’s for sure.

IMGP3444 (2)

In order to try and nourish his little body I devised a cunning plan to make sure his beloved chocolate milk was full of the good stuff.  I bought a decent blender and started with just full cream milk, cacao and honey.  Initially, he told me it was yuck and he wouldn’t drink it.  However, every time he asked for chocolate milk (daily!) this is what I gave him.  Blow me down, he eventually started drinking it.  I then decided to boost it a bit more and added banana, which was a downright fail. Next step was to add frozen banana instead to make it more like a milkshake, all cold and creamy.  It is amazing how changing the texture of a disliked food can all of sudden make it a liked food.  He even started eating frozen banana pieces all on their own, woohoo.  I thought that I would try and take this milk even further and added avocado for a good fat and fibre hit.  He didn’t even notice this change and hoovered it up.

IMGP3433 (2)

I have never met a child who can drink chocolate milk quicker than my little fella. He will have his ‘chocolate milk’ most mornings as well as his breakfast.  Mackie is now what I consider to be an ‘eater’, trying new foods and inhaling favourites.  Like most kids, some days sees him eating way more than others.  He follows his hunger cues and I just go with it and I don’t let it stress me out like it used to.

IMGP3454

Mackie’s Chocolate Milk

Serves 2

2 cups milk of choice (cow’s, almond, whatever your little person is into)
1-2 tsp cacao powder, depends on how chocolately you like it
1-2 tsp honey, depends on how sweet you want it
1 frozen banana
1/4 avocado

Pop everything into a blender and blitz until smooth and creamy.  Serve in a favourite glass, fancy stripey straw optional.

Taking Stock

IMGP3344 (2)

Pip Lincolne from Meet Me At Mikes is pretty amazing  and she rather cleverly came up with a brilliant idea of Taking Stock.  I have been reading a fair bit about mindfulness of late and thought that this was the perfect time to look over the smaller detail of my life in this moment.  It’s also a pretty cool to read back over it in a few months time.

Making: a whole lot of mess in my kitchen.

Cooking: Apple Pie Chickpeas, an epic fail as I really don’t like chickpeas!  Hopefully the kids will.

Drinking: ginger and lemon kombucha.

Reading: a book on mindful eating written by a Buddhist monk and a nutritionist

Wanting: to not wear so many layers, damn winter.

Looking: at old photos of little blond-headed cherubs on my computer.

Playing: connect four with my youngest.

Wishing: for warmer weather.

Enjoying: the magnolia blooms in other peoples gardens (lucky them).

Waiting: for my computer to stop being a jerk.

Liking: so much prettiness on Instagram.

Wondering: what to cook for dinner tonight.

Loving: The Goldfinch by Donna Tartt.

Pondering: why my computer is being such a jerk.

Loving: peanut butter.

Considering: getting up to put another load of washing on (Nah).

Marveling: at my littlest teaching himself to read.

Smelling: chocolate granola baking in my oven.

Needing: someone else to clean my oven.

Wearing: a dress! This rarely happens.

Thinking: a lot about mindfulness

Admiring: my talented friends

Sorting: socks, so many socks for such little feet

Buying: too many cookbooks.  Now, where do I put these new ones.

Getting: really excited about blogging

Disliking: this current government, so much to dislike about these jokers.

Giggling: like a schoolgirl with my schoolgirls.

Feeling: really proud of my schoolgirls.

Snacking: on chocolate and peanut butter fudge that was a happy accident.

Coveting: the new Country Road picnic containers.

Wishing: it was picnic weather.

Hearing: my cat at the door, she wants in.  Now!

IMGP3416